Each participant’s session is acquired by following a roadmap that has been set up with the engineers of the MRI Center. This roadmap defines the set and order of the tasks to be performed from the time the participant is taken over until the data is made available.
Each project has its own roadmap, which must be respected and, if necessary, specified. It is a reference document for each step.
We detail here the general aspects related to the acquisition of MRI data. These acquisitions are included and ordered in a list (protocol) that has been set up with the engineers of the MRI Centre (see figure below). It is this protocol that was selected in the second panel when the subject was registered.
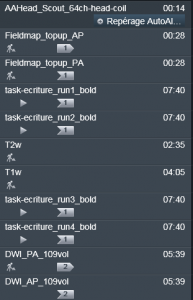
Excerpt from a sample MRI protocol
The SyngoMR examination screen
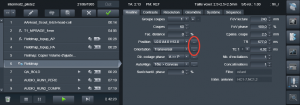
Once the protocol has been recorded at the console, the user is in front of the next panel:
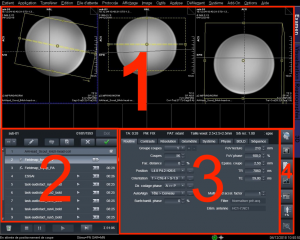
- Images used to mark the scan in preparation. The Field of View (FOV) is indicated in yellow on these images.
- List of sequences in the current protocol. The sequence in preparation is highlighted.
- Complete details of the parameters of the sequence in preparation.
- Shortcuts to different actions to set up the screen, display the images in lines, manipulate the table, display the measurements of the physio sensors, monitor the SAR (energy deposited in the subject).
Localizer
Whatever the final modality(s) of the examination (anatomy, functional, diffusion, quantitative, …) it is necessary to begin the series of acquisitions by a localization scan called localizer. Its purpose is to acquire images that will be used to locate the following acquisitions: launch with the green arrow: ![]() . The images used for positioning will be automatically loaded in the 3 upper tabs (panel 1 in the figure above).
. The images used for positioning will be automatically loaded in the 3 upper tabs (panel 1 in the figure above).
For cerebral type examinations only, and using the 64-channel antenna, this scan is generally called:
AAHead_Scout_64ch-head-coil
( as soon as possible: )Launch FIRMM
Anatomical acquisitions T1w ( et T2w)
These are high spatial resolution images (generally 1mm or even 0.8mm isotopic), used for morphometric studies and for the standardization of functional and diffusion images. The subject has nothing to do but not move, a film can be projected to pass the time (this can even help to reduce the subject’s movements). The orientation of the yellow box (acquisition volume) is automatically determined in relation to the tracking image (see example below): check that the whole head is inside, especially the back of the skull and the tip of the nose. To translate the yellow box, click on the central yellow circle and move the mouse to the desired position while keeping the mouse button pressed.
Click on ![]() to launch the sequence when the positioning is correct.
to launch the sequence when the positioning is correct.
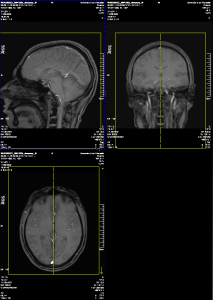
Positioning of the field of view (yellow box) of the anatomical sequences: check the centering in relation to the head and check that the nose and the back of the skull do not stand out of the yellow box.
Magnetic Fielmap B0
The magnetic field of the MRI is disturbed by the presence of a body in the tunnel. Automated procedures (“shimming”) are used to compensate for these perturbations but they are imperfect and B0 field inhomogeneities persist, typically at the air-tissue interfaces around the brain.
These field inhomogeneities cause distortions in functional images. To correct these geometrical distortions during the pre-processing steps, it is recommended to acquire a B0 field map. Several methods exist, the choice made at the MRI center is to use a Spin-Echo EPI sequence with AP and PA encoding. In the protocol, these sequences are entitled: Fieldmap_topup_AP and _PA.
They are axial-oblique acquisitions: the orientation is determined automatically with respect to the calosal line of the subject located on the localizer images: The positioning of the field of view (yellow box) and the shim box (green box) will be automatically copied for all the following functional images.
TO DO: Translating the yellow box to cover the brain (click on the central circle to move the box).
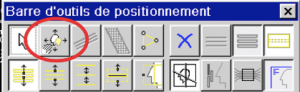
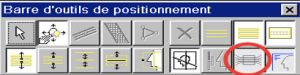
Tip: To unzoom the positioning images, click on the right side of the screen to display the toolbar and click on :![]()
The positioning toolbar below appears: click on the red surround button to activate the zoom: on the viewing image, if the mouse is near the center, click and move to move the image. If the mouse is near a corner, click and move up to zoom in, down to zoom out.
Functional Acquisitions
The parameterization of the functional sequences was defined upstream by the engineers of the MRI centre during the preparation of the protocol in agreement with the research team and there is nothing more to modify when the scan is launched.
The fMRI sequences are entitled:task-XXXX_runYY_bold.
The scan starts automatically (a few seconds) until the following window appears:
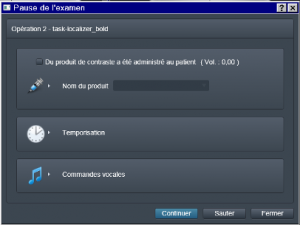
- Launch the stimulation program on Bruno’s computer.
- Click on “Continue”: the MRI starts, after about ten seconds and the acquisition of the dummy scans (which are not recorded), the first triggers are sent and the stimulation programme starts, synchronised with the MRI.
Diffusion MRI
This involves repeated measurements of brain images with a weighting of each image that will be defined by the diffusivity of water molecules in a given direction. The standard protocol proposed by the MRI Centre consists of the repetition of two sequences with opposite phase encoding directions AP and PA. The sequences are entitled DWI_PA_109vol and DWI_AP_109vol: the images are acquired in oblique – axial orientation, along the subject’s calosal line, defined automatically once again on the basis of the location images: Translating the yellow box to encompass the entire brain.
Click on![]() to start the sequence when the positioning is correct. The positioning of the first sequence is automatically transferred to the second one which will start automatically.
to start the sequence when the positioning is correct. The positioning of the first sequence is automatically transferred to the second one which will start automatically.
Ancillary activities :
– Communication with the subject :
– Adjusting the position of the table, lights and ventilation from the console
– Position the field of view, i.e. the FOV: (yellow box)
– Make the adjustment volume visible (green box)
– Verify or change the number of volumes acquired from functional imaging
-Trouble shooting
-Communication with the subject (with the Siemens intercom)
Press the left button to listen to the subject. Do not forget to turn it off before starting the sequences. Press the right button to speak, release it once you have finished your sentence to hear the subject’s answer (similar operation to a walkie-talkie).
-Adjust the position of the table, lights and ventilation from the console.
Press ![]() on the right side of the screen. Settings locked while an image is being captured.
on the right side of the screen. Settings locked while an image is being captured.
– Position the field of view, i.e. the FOV: (yellow box):
- either by clicking in the center of the yellow box and moving the mouse to change the position.
- either by clicking on one side of the yellow box and moving the mouse to change the orientation of the box (be careful not to change the size of the box!). If it happens, click on the cross to cancel the changes and double-click on the sequence to be programmed to open it).
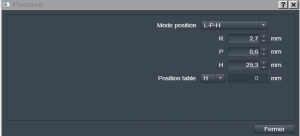
- or by clicking on ” … “next to “Position” and/or “Orientation” in the parameter grid of the sequence ready to be started and adjusting the values for each direction: see below.
– Make visible the adjustment volume (volume on which the shim B0 will be optimized) (green box)
→ click on ![]() on the right side of the screen to display the toolbar and click on :
on the right side of the screen to display the toolbar and click on :
– Check or change the number of volumes acquired from functional imaging :
Go to the tab: Contrast > Dynamics and read/modify the number of “Measurements”.
– Trouble shooting:
- watch the two pictograms at the bottom of the screen : if they are crossed out yellow or red, action may be required to continue.
- The subject presses the pear: the alarm sounds. Press the stop button on the intercom, stop the sequence, talk to the subject.
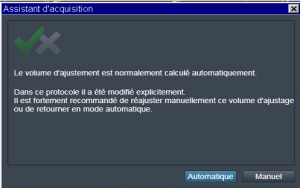
- if the following window appears when launching the sequence: It is about the fact that the adjustment volume (green box) is different from the acquisition volume (yellow box): click on “Manual” to open the sequence and position the volumes if necessary.